C100mk2 viewing LUT
gamutは色域 gammaは階調(カーブ)

まずはc100のおすすめ設定について
Before shooting:
1. Set minimum ISO to 850. Unlike with a traditional DSLR, choosing a lower ISO will NOT result in a better image on this camera. Instead, it will rob you of dynamic range. So always always always set a minimum ISO of 850. In low light you can go higher – much higher, in fact, and get great results. But never go lower.
2. Shoot Canon Log (CP Cinema Locked). This is the only way to get the full 12 stops of dynamic range out of your camera. The footage will initially appear flat when you view it. But you have plenty of quick options for giving it snap, crackle and pop by applying LUTs. More about that momentarily.
3. Enable View Assist. The image on your LCD will appear flat, and to fix that and give you an approximation of the final image while shooting, you’ll need to turn on the view assist. It’s located in the LCD menu. TIP: I add this and several other settings to the custom menu, which makes finding them much quicker than hunting through the menus.
After shooting:
4. Use a LUT. A LUT (Look Up Table) is an automatic color correction designed specifically for your camera, which is applied to your footage in post. Which LUT to use? I recommend these free EOS Cinema LUTs from Able Cine. To apply them to your footage, you’ll need an inexpensive plugin like the $29 LUT Utility. These will work as a plugin to the NLE of your choice (i.e., Premiere, FCPX, etc).
5. Adjust LUT intensity to get desired look. Using LUT Utility, you can adjust the effect from zero to 100 percent. I often find that dialing in 60-80 percent of the effect is just about right.
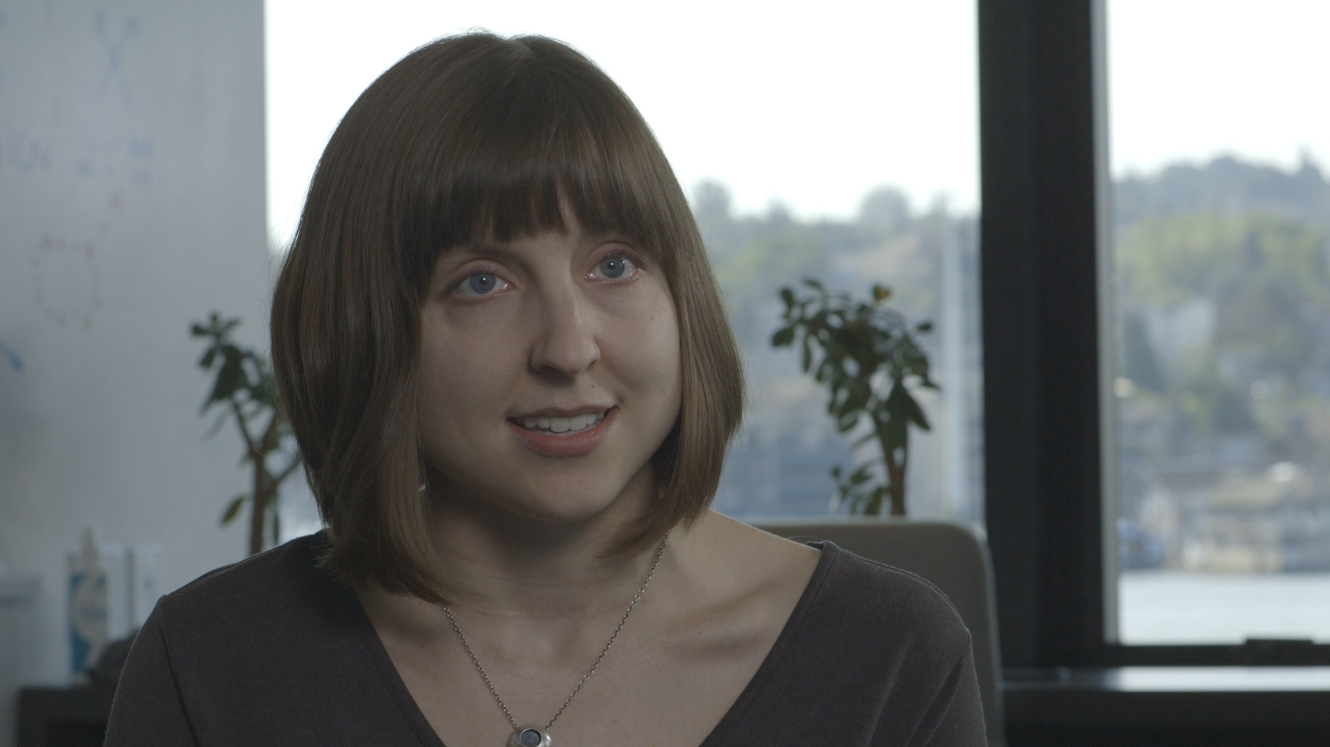
Here’s an example, an interview shot in front of a window. The challenge is we’d like to make her skin look awesome, while at the same time retaining as much highlight information as possible in the background. So we shoot in CP Locked, and…
Above: CP Locked footage looks flat prior to grading.
LUT applied (no other color correction). As you can see above, this instantly does wonders for our footage. But it still needs a little work.

wideDR gamma
wideDRで収録するのか、c-logで収録してから「wideDR」のLUTを当てるのか?その違いは??
wideDRで収録すると、収録された素材には「600%」までしか記録されない。それ以上のハイライトのデータはセンサー上で捕えていても記録されない。
他方、c-logで収録すると「800%」まで記録される。
情報量の多い素材を、収録後に情報を切り捨てることになる。
CANON純正LUT
記事の項目「4」についてはメーカー純正のLUTが現在は配布されている。該当する機種を選択して、進むとファイルが見つかります。

ZIPを解凍するとフォルダ内には以下のようなファイルが入っています。

各言語の説明書のPDFファイルと「1Dlut」「3Dlut」のフォルダ。
カメラが3グループに分かれていて、それぞれに対応したLUTがどれなのかわかるようになっています。
1dLUTはガンマの変換(カーブ)のみで、
3dLUTはガンマと色域の変換ができます。
但し、c100のデータでは色域(709)の変換はできません。
709の色域が一番狭いので、業務的な都合がないかぎりあまり意味もないですが、、、
5dmk4のc-logはグループ3で「1Dlut」にのみ対応しています。
c100mk2はグループ2で「1Dlut」「3Dlut」に対応しています。
細かなことは説明できませんが、「3Dlut」の方が複雑なLUTであることは間違えないようです。
以下参照
https://is.wowowent.co.jp/download/lut_and_hdr2017.pdf


canonの3dLUTには「格子点」→「グリッド数」と表記されている。
グリッド数が「17」「33」「65」のLUTが用意されている。
「65」が一番細かく計算している。

変換後のレンジが「Full」と「narrow」の2種類あります。
「Full」は文字通り0%から100%までを使います。
但し、TVの信号には適合しないので「narrow」レンジが容易されています。canonの人は「full」は映画用、「narrow」はTV用と説明していました。
AEでLUTを当てる。
以下のエフェクトでLUTを当てることができます。

「カラーLUTを適用」をクリックすると、LUTファイルを選択するウィンドウが表示されます。
あるいは、、、

「基本設定」の中でLUTを選べます。

プレミアからだと、、、「color」でLUTを当てることができます。

